
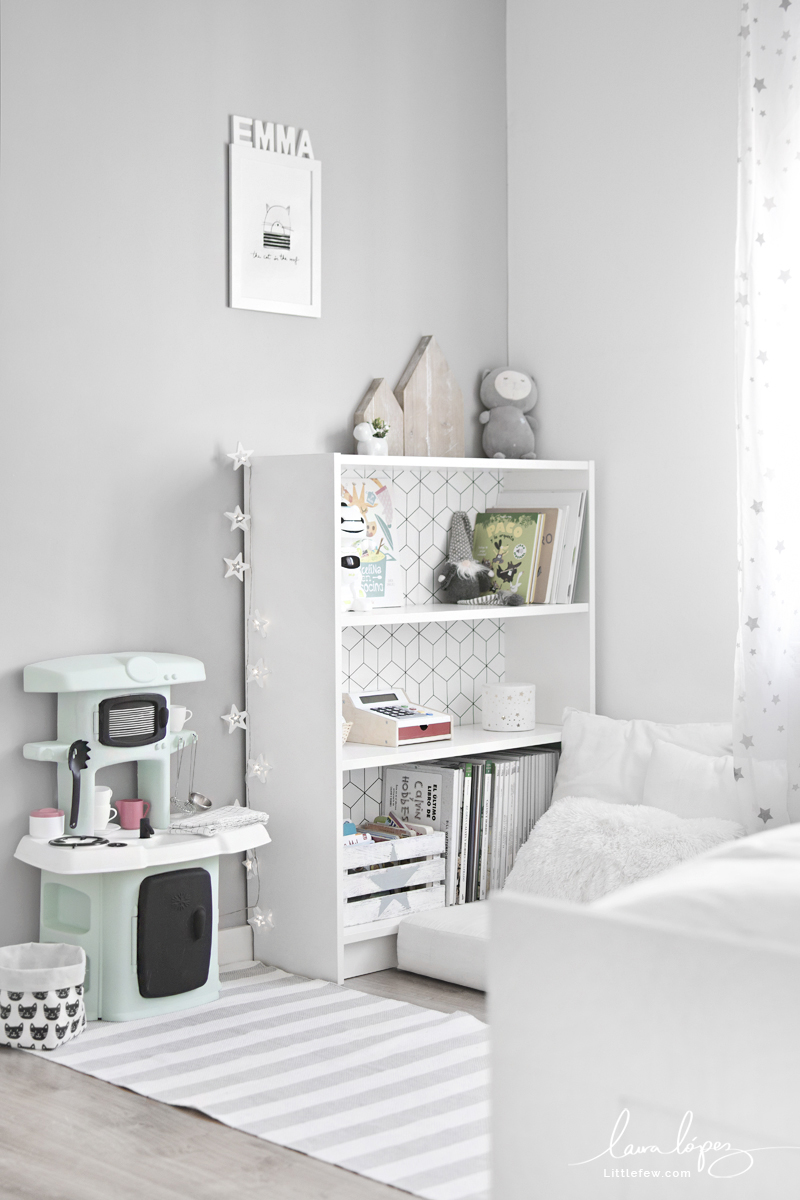
CÓMO TRANSFORMAR UNA VIEJA COCINA DE JUGUETE Y CREAR UN RINCÓN DE LECTURA INFANTIL.
Esta semana me hace mucha ilusión enseñaros cómo 'hackear' una cocinita de juguete con pintura de pizarra. En realidad, es una cocinita de plástico que nos dieron de segunda mano, pero como estaba muy rayada en algunas partes, decidí darle una manita de pintura para modernizarla y que entonara mejor en el cuarto infantil. A continuación podéis ver el proceso...
// This week I am so excited to show you my daughter's toy kitchen. Actually, it is an old little plastic kitchen, but since it was very scratched in some places, I decided to give it a second life with chalk paint in white and mint. Here you can see the process...

Lo primero fue quitarle todos los accesorios y pegatinas, y después la limpié muy bien con agua templada y jabón. Luego le di un par de capas de pintura efecto tiza (en color blanco y mint) y las dos puertas y el grifo con pintura de pizarra negra. Por último añadí wasi-tape de rayas en la puerta del horno, y coloqué los accesorios otra vez. ¡Aquí lo tenéis en detalle! ;)
// The first thing was to remove all the accessories and stickers, and then I cleaned it well with warm water and soap. Then I gave it a two layers of chalk paint (in white and mint) and the two doors and the tap with black chalkboard paint. Lastly I added striped wasi-tape on the oven door, and placed the accessories again. Here you have it in detail! ;)


Y aprovechando que hemos organizado varias zonas de la casa (podéis ver el post aquí), también quería enseñaros cómo hemos recolocado los muebles del cuarto infantil para crear un sencillo y confortable rincón de juegos y de lectura junto a la ventana, con unos cojines, la librería forrada (que antes hacía de cabecera de la cama) ¡y la cocinita terminada!.
// And as we´ve organized some rooms at home (you can see the post here), I also wanted to show you how we´ve created a simple and comfortable play and reading corner near the window, with some cushions, the lined bookcase (that used to be the headboard before) and the kitchen finished!


La verdad es que nos encantan la cocinita de madera (que son neutras para ambos sexos y además se pueden customizar muy fácilmente)... pero si tenéis una vieja cocinita de juguete, pensad en pintarla antes de tirarla ¡porque ya veis que no cuesta nada y a vuestros hijos les va a encantar!. ¡Espero que os haya gustado y ya me diréis qué os parece!.
// We love the wooden kitchens for kids (which are neutral for both sexes and also can be customized very easily) but if you have an old kitchen toy, think about painting it before throwing it away, because it costs nothing to update it and your children will love it!. I hope you liked it and you'll tell me what you think!

Images © Laura López / Littlefew.com
Y si necesitas más inspiración, aquí os dejo mis tres transformaciones favoritas de la cocina infantil de madera de IKEA... ¡feliz semana a todos! ;)
And if you need more inspiration, here are my three favorite transformations of the IKEA wood kitchen... ¡happy week to everyone!;)

/ 1. One Mum´s Style / 2. Indi & Bear / 3. Hello Blogzine
Y si necesitas más inspiración, aquí os dejo mis tres transformaciones favoritas de la cocina infantil de madera de IKEA... ¡feliz semana a todos! ;)
And if you need more inspiration, here are my three favorite transformations of the IKEA wood kitchen... ¡happy week to everyone!;)
/ 1. One Mum´s Style / 2. Indi & Bear / 3. Hello Blogzine


